The bug bounty community has finally caught my attention and it’s time for me to take a stab at finding some web application vulnerabilities in the wild. Before I started this process I took a few weeks to get accustomed to the current toolset being used and how they work. So basically it comes down to tons of recon over a large scope in order to identify the “low hanging fruit” before other hunters. This requires innovation, creativity, and automation.
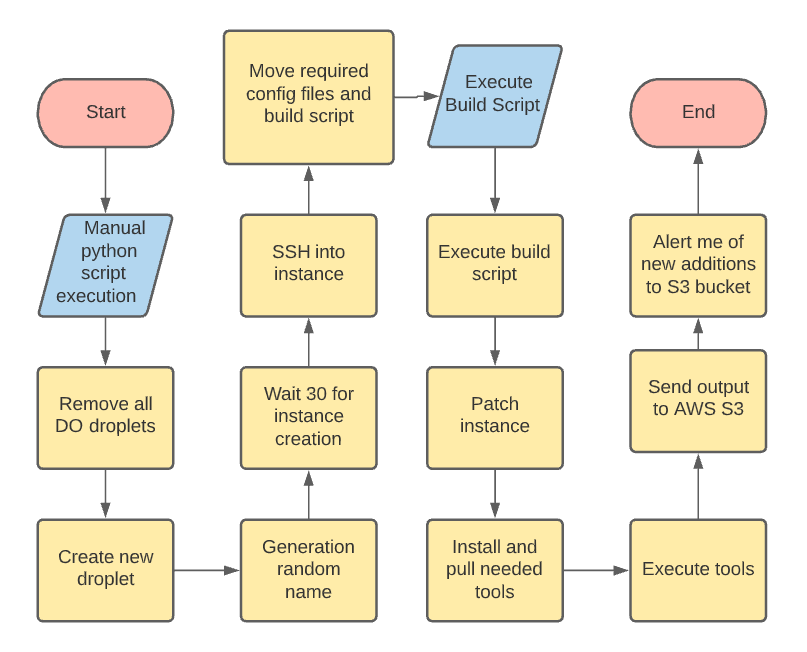
To start the process I want a simple way to rebuild the machine as needed with all my tools and configurations in place. For this, I will be using python and bash. I am comfortable with both and want to get into hunting as soon as possible. First, let’s start with a chart showing our goals and how they should work.
Planning
Flow chart:
My primary tool to work on this Proof of Concept will be amass. This tool is regularly maintained and seems to get great subdomain results. The project can be found on Github https://github.com/OWASP/Amass.
To properly use amass there is a long process of creating accounts and generating API keys for all the free or paid services. This takes a while, but should only need to be done once. We can then move the configuration file that contains the keys to the generated instance each time.
Additionally, I added the following tools for further enumeration:
Building
After a bit of research on VPS locations, I settled on Digital Ocean because of the controlled monthly cost and acceptance of penetration test traffic at all hours. In addition, an easy-to-use python module has been created to allow Digital Ocean API calls for automation.
To start let’s build a repeatable process to create the VPS and toolset needed to start. For this, I started with the python library “python-digitalocean”. Check out the library https://pypi.org/project/python-digitalocean/.
Install the library using pip.
PS C:\Users\trenchesofit> pip install -U python-digitalocean
The goal here is to remove all current droplets, create a new droplet with existing ssh keys, drop the bash build script along with any additional configuration files onto the droplet, and finally execute the build script. Keep in mind I am not a programmer and just threw the code together so I could get started and have a repeatable process to allow easy rebuilds as needed.
Python script
# Bug bounty build script
# Author: Trenches of IT

import digitalocean
import random
import time
import paramiko

ssh_client = paramiko.SSHClient()
ssh_client.set_missing_host_key_policy(paramiko.AutoAddPolicy())
manager = digitalocean.Manager(token=$token)
key = manager.get_all_sshkeys()

def createDroplet(number):
    print("[+] Creating new droplet...")
    droplet = digitalocean.Droplet(token = manager.token,
                                   name = 'bugbounty' + str(number),
                                   region = 'nyc3',
                                   image = 'ubuntu-20-04-x64',
                                   size_slug = 's-1vcpu-1gb',
                                   ssh_keys = key,
                                   backups = False)
    droplet.create()
	complete()


def deleteAllDroplets():
    print("[+] Removing all droplets...")
    my_droplets = manager.get_all_droplets()
    for droplet in my_droplets:
        droplet.destroy()
	complete()

def randomDropletName():
    number = random.randint(1, 1000)
    return number

def getIP():
    my_droplets = manager.get_all_droplets()
    for droplet in my_droplets:
        data = droplet.load()
        publicIP = data.ip_address
        return publicIP

def executeBuild():
    stdin, stdout, stderr = ssh_client.exec_command('chmod +x buildscript.sh')
    print(stdout.readline())
    stdin, stdout, stderr = ssh_client.exec_command('bash /root/buildscript.sh')
    print(stdout.readline())
    time.sleep(600)
    complete()

def moveFiles():
    sftp_client = ssh_client.open_sftp()
    #VPS Build Script
    sftp_client.put('C:\\Users\\trenchesofit\\PycharmProjects\\bugbountyvps\\buildscript.sh','buildscript.sh')
    #Amass config
    sftp_client.put('C:\\Users\\trenchesofit\\PycharmProjects\\bugbountyvps\\config.ini', 'config.ini')
    #AWS config
    sftp_client.put('C:\\Users\\trenchesofit\\PycharmProjects\\bugbountyvps\\.aws.zip', '.aws.zip')
    #AWS Upload Script
    sftp_client.put('C:\\Users\\trenchesofit\\PycharmProjects\\bugbountyvps\\awsupload.sh', 'awsupload.sh')
    #AWS Upload Service
    sftp_client.put('C:\\Users\\trenchesofit\\PycharmProjects\\bugbountyvps\\awsupload.service', 'awsupload.service')
    sftp_client.close()
    sftp_client.close()
	complete()


def complete():
    print("[+] Complete")


deleteAllDroplets()
createDroplet(randomDropletName())
print("[+] Getting instance information...")
time.sleep(30)
ssh_client.connect(hostname=getIP(), username='root', password=$Password,
                       key_filename=$PathToSSHKey)
print("[+] Waiting for sshd to start...")
time.sleep(60)
sshConnection()
print("[+] Moving needed files to target server...")
moveFiles()
print("[+] Executing commands...")
executeBuild()
Again in an effort to speed up the build process, I have put together a bash script to do all instance actions. As seen in the flow chart above, the build script patches the instance -> installs the needed tools -> moves configuration files to the correct locations -> cleans up any leftover files.
Bash script.
#!/usr/bin/env bash
set -e

# Bug bounty build script
# Author: Trenches of IT

echo "[+] Building VPS bug bounty server"
echo "[+] OS: Ubuntu"
echo "[+] Author: Trenches of IT"

echo "[+] Updating Packages"
apt-get -y update && apt-get -y upgrade

echo "[+] Installing unzip"
apt-get -y install unzip

echo "[+] Installing git"
apt-get install git

echo "[+] Installing tmux"
apt-get install tmux

echo "[+] Installing go"
wget https://golang.org/dl/go1.16.4.linux-amd64.tar.gz
rm -rf /usr/local/go && tar -C /usr/local -xzf go1.16.4.linux-amd64.tar.gz
export PATH=$PATH:/usr/local/go/bin
cp /usr/local/go/bin/go /bin/go
go version

echo "[+] Installing NMAP"
apt-get -y install nmap

echo "[+] Installing anew"
go get -u github.com/tomnomnom/anew

echo "[+] Installing waybackurls"
go get github.com/tomnomnom/waybackurls

echo "[+] Installing massdns"
git clone https://github.com/blechschmidt/massdns.git

echo "[+] Installing gobuster"
apt-get -y install gobuster

echo "[+] Installing ffuf"
go get -u github.com/ffuf/ffuf

echo "[+] Bypass 403 pull"
git clone https://github.com/iamj0ker/bypass-403
chmod +x /root/bypass-403/bypass-403.sh

echo "[+] SecLists pull"
git clone https://github.com/danielmiessler/SecLists.git /usr/share/wordlists/

echo "[+] Installing amass"
sudo snap install amass

echo "[+] Installing aws cli"
apt-get -y install awscli
unzip /root/.aws.zip -d /root/

touch subdomains.txt

echo "[+] Configuring AWS upload service"
chmod +x /root/awsupload.sh
mv /root/awsupload.service /etc/systemd/system/awsupload.service

echo "[+] Starting AWS upload service"
systemctl enable uploadscript.service
systemctl start uploadscript.service

echo "[+] Configuring hostname"
hostnamectl set-hostname TrenchesofIT
cat << EOF > /etc/hosts
127.0.0.1 localhost
127.0.0.1 TrenchesofIT
EOF

echo "[+] Cleaning up"
rm -rf /root/buildscript.sh
find /var/log -type f -exec sh -c "cat /dev/null > {}" \;
Storage
Next, we need to work on the external storage of the findings to allow the machine to be destroyed at any point without losing any important data output from the tools. For this, I will be using AWS S3.
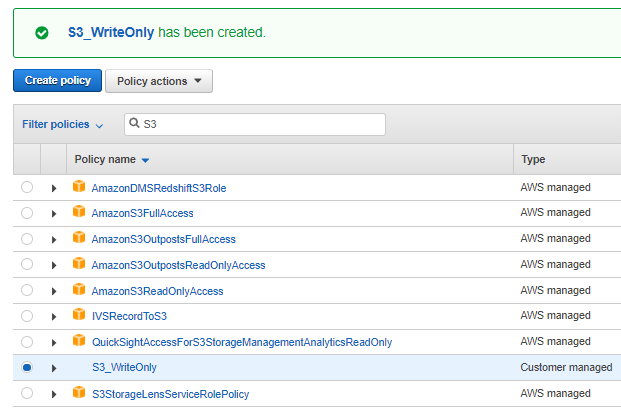
First we need to create a user that will be used only for this purpose. Create a policy that will only allow write only.
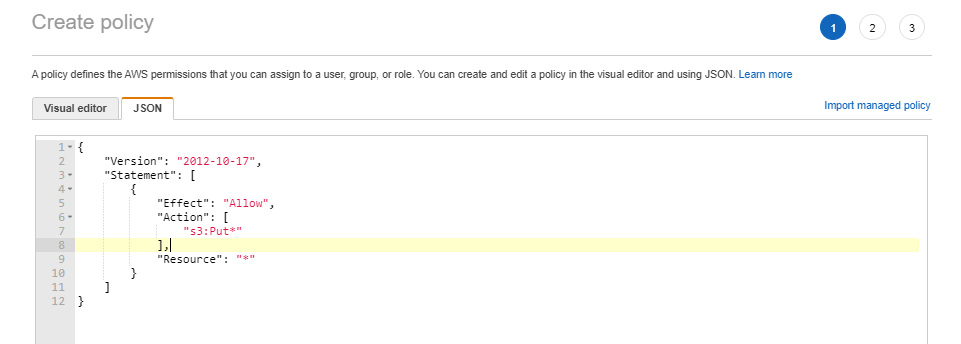
Save the new policy.
Create the API user.
PS C:\Users\trenchesofit\> aws iam create-user --user-name $Username
Find the created policy.
PS C:\Users\trenchesofit> aws iam list-policies --scope Local | findstr S3_WriteOnly
            "PolicyName": "S3_WriteOnly"
Attach the created policy to the new user.
PS C:\Users\trenchesofit> aws iam attach-user-policy --user-name $Username --policy-arn arn:aws:iam::123456789012:policy/S3_WriteOnly
Creating API Keys.
PS C:\Users\trenchesofit> aws iam create-access-key --user-name $Username
{
    "AccessKey": {
        "UserName": "$Username",
        "AccessKeyId": "$AccessKeyID",
        "Status": "Active",
        "SecretAccessKey": "$SecretKey",
        "CreateDate": "2021-06-07T00:17:57+00:00"
    }
}
Create a new S3 bucket to house the new subdomain findings. Ensure the AWS configuration files containing the API keys are transferred with the python script.
PS C:\Users\trenchesofit> aws s3api create-bucket --bucket TrenchesofITS3 --region us-east-1
{
    "Location": "/TrenchesofITS3"
}
Now let’s build out the looping service that will upload the new subdomains every hour. For this, I will create a bash script and service.
AWS upload bash script:
#!/bin/bash
#Script to check subdomains.txt every hour and upload if new items have been added
while true; do echo subdomains.txt | /root/go/bin/anew | aws s3 cp subdomains.txt s3://TrenchesofITS3/ ; sleep 3600 ; done
AWS upload service configuration file:
[Unit]
Description= Service to check subdomains.txt every hour and upload if new items have been added

[Service]
User=root
Type=simple
ExecStart=/bin/sh /root/awsupload.sh
Restart=always

[Install]
WantedBy=default.target
Listing the contents of the test .txt sent from the bug bounty instance.
PS C:\Users\trenchesofit> aws s3 cp s3://TrenchesofITS3/subdomains.txt -
testing1
testing12
testing15
whatever
Great, now we have resulted from amass uploading to s3.
Alerting
When the file is uploaded to S3, I will get a notification from AWS SNS. First, create the event notification configuration on the created S3 bucket.
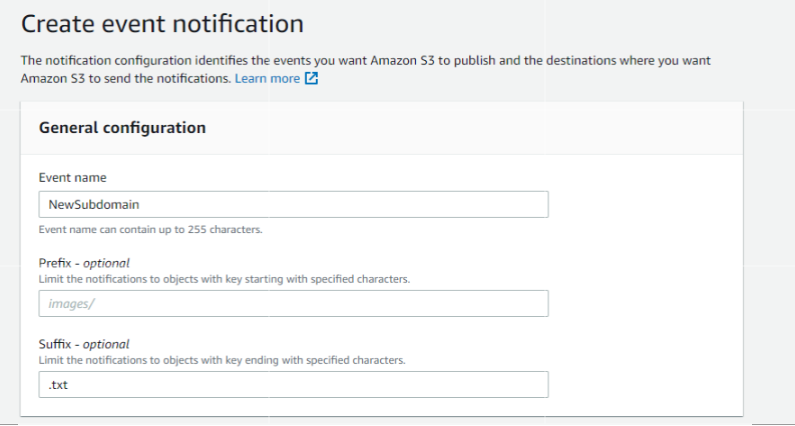
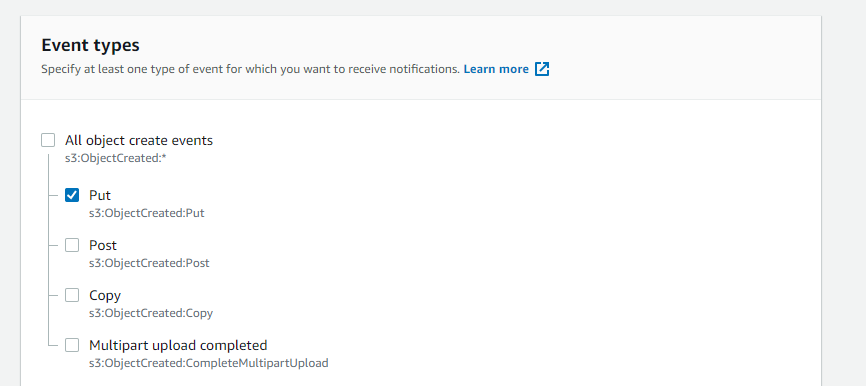
Specify what event will cause the event to trigger. Here we will do Put only.
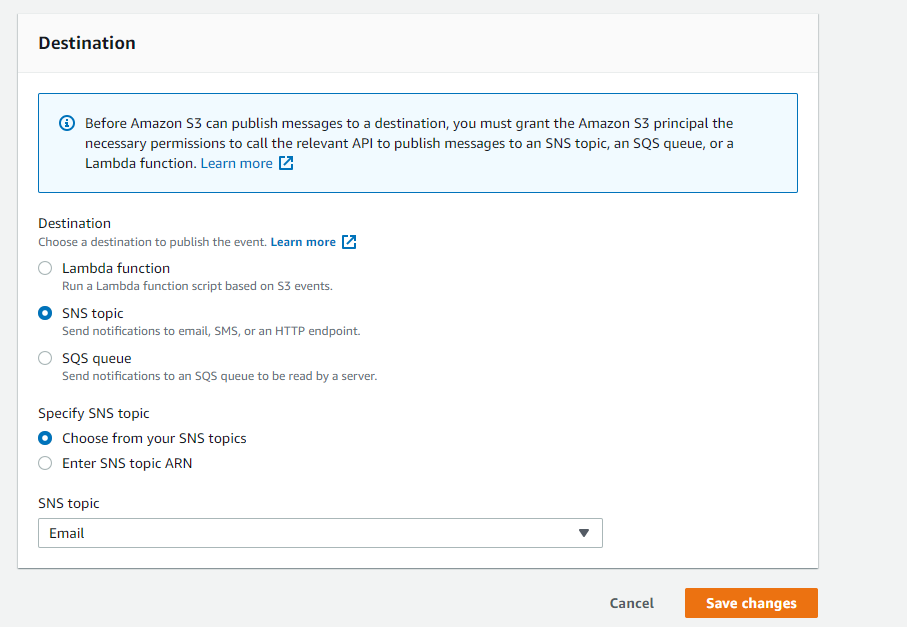
SNS creation here. Ensure to select an available SNS topic.
Testing
Execute the python script.
C:\bugbountyvps\main.py
[+] Removing all droplets...
[+] Complete
[+] Creating new droplet...
[+] Complete
[+] Getting instance information...
[+] Connect to the instance with the following command:

 ssh -i C:\Users\keyfile.pem root@167.172.30.102
[+] Waiting for sshd to start...
[+] Moving needed files to target server...
[+] Complete
[+] Executing commands...

[+] Building VPS bug bounty server

[+] Complete
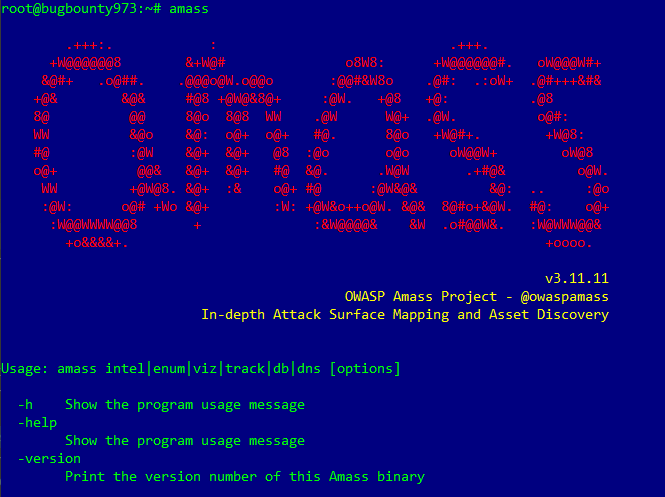
Testing amass executing enumeration against “trenchesofit.com” using the provided config.ini containing all the API keys and outputting the results to subdomains.txt that will be stored in S3.
root@bugbounty973:~# amass enum -d trenchesofit.com -config /root/config.ini -o subdomains.txt
www.trenchesofit.com

OWASP Amass v3.11.11                              https://github.com/OWASP/Amass
--------------------------------------------------------------------------------
1 names discovered - cert: 1
--------------------------------------------------------------------------------
ASN: 14618 - AMAZON-AES - Amazon.com, Inc.
        35.153.0.0/16           1    Subdomain Name(s)

The enumeration has finished
Discoveries are being migrated into the local database
Ensure the AWS upload service is running.
root@bugbounty172:~# systemctl status awsupload.service
● awsupload.service - Service to check subdomains.txt every hour and upload if new items have been added
     Loaded: loaded (/etc/systemd/system/awsupload.service; enabled; vendor preset: enabled)
     Active: active (running) since Mon 2021-06-14 02:10:54 UTC; 4s ago
   Main PID: 16342 (sh)
      Tasks: 2 (limit: 1136)
     Memory: 520.0K
     CGroup: /system.slice/awsupload.service
             ├─16342 /bin/sh /root/awsupload.sh
             └─16352 sleep 3600
Checking S3 for the uploaded subdomains.txt file.
PS C:\Users\trenchesofit> aws s3 cp s3://TrenchesofITS3/subdomains.txt -
www.trenchesofit.com
Success!
Conclusion
So up to this point, we have a one-click machine rebuild method that will allow us to quickly stand up an instance and get to work. I will still need to manually log into the instance and execute the tools. This project is a work in progress and will need some refinement and additional automation in the coming months but this is a nice framework for me to start with.
Hopefully, this will help those getting started in bug bounty hunting to get up and running quickly. Feel free to reach out with any suggestions or questions on Twitter.
Until next time, stay safe in the Trenches of IT!